Pocket DJ Drum Machine
A pocket-sized, sample-based drum machine I'm building on a Teensy 4.1 — eight voices, a 16-step sequencer, and enough velocity pads to actually play it live over a DJ set. Currently: the firmware core works and is tested. The hardware doesn't exist yet.
Why I'm building this
I DJ. And every set eventually hits the same wall: the drums are baked into the track, so you can groove with the mix but you can't actually play anything on top of it. Drum machines exist for exactly this — but the ones I like are either full-size studio gear that doesn't fit in a DJ bag, or software that means staring at a laptop instead of the crowd. I wanted something pocket-sized, physical, and tactile enough to play one-handed while the other hand's on a fader.
It's also my first real embedded project — a good excuse to learn hardware and firmware properly rather than just reading about it.
What it does
Tap one of eight pads and you get a sample — kick, snare, clap, closed hat, open hat, two percussion voices, crash. Perform mode is exactly what it sounds like: pads trigger sounds live, like a finger drum kit. Edit mode turns the same eight pads into a 16-step sequencer, with eight patterns to flip between and per-track mutes so you can drop elements in and out mid-set.
Two knobs matter most. Density thins or fills the whole pattern from a single control — turn it down and the sequencer keeps the quarter-note downbeats and drops the 16ths first, so it never collapses into random noise. Swing pushes the groove off the grid without changing the bar length. A play button, a mode button, a shift button, and four pots is the entire control surface — everything else is held-and-tapped combinations of those three buttons.
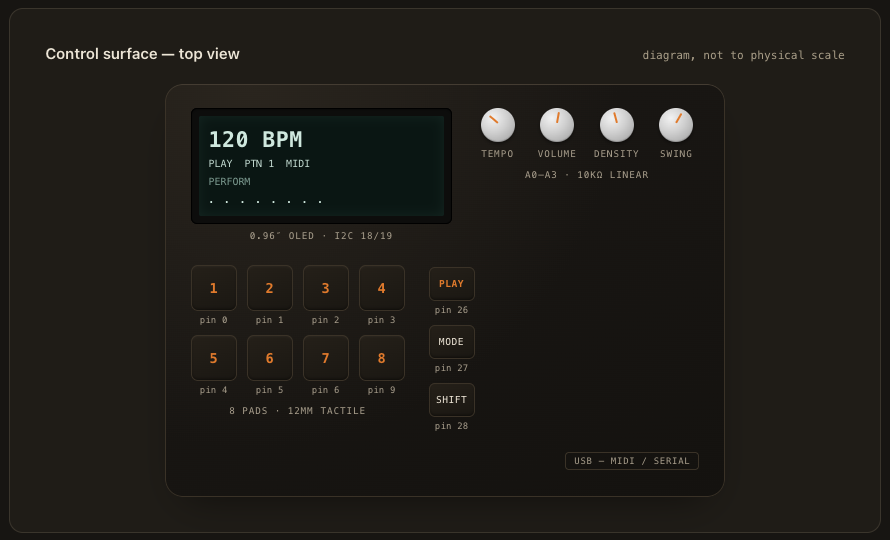
Target control surface layout, from the design spec — not a photo of the current build.
Under the hood
A Teensy 4.1 drives an Adafruit PCM5102 I2S DAC for audio out, a small OLED for status, and USB MIDI in both directions — it sends and receives notes 36–43 on channel 10, so it'll happily drive or be driven by a DAW.
The rule I set myself early on: all the musical logic — the sequencer grid, the density and swing maths, the pad-and-modifier state machine — lives in plain C++ with zero Arduino includes, so it compiles and unit-tests on my Mac without touching any hardware. The Teensy-only layer (audio engine, MIDI, UI, diagnostics) is a thin wrapper around that core. It means I can get the musical behaviour right and tested before I've soldered a single pin — which, for a first embedded project, felt like the only sane way in.
How pressing a pad turns into sound, left to right.
Samples are compiled straight into flash rather than read off an SD card, so it boots to playable in well under ten seconds.
The hard part
Two things fought me. First, the density knob — a single dial that "thins" a pattern intelligently is deceptively hard. Turn it down and you want the groove's skeleton (kick, snare) to survive while the decoration (16th-note hats) drops out first, not a random subset of whatever. I ended up giving every track-and-step pair a fixed weight and only firing it below a threshold, so the same pattern always thins the same way — less "clever algorithm," more "give every step a should-I-play score, then move the goalposts."
Second, timing. The sequencer clock lives inside a hardware interrupt so the audio never stutters, and I had to resist the urge to touch the display from anywhere near that interrupt — do that and the groove visibly wobbles. The OLED only gets to render from the slow, boring main loop, throttled so it can't interfere.
Where it's at
- 26 host unit tests passing — sequencer, clock/swing maths, pad-and-modifier state machine, pot filtering
- A host-side sequencer simulator running, plus an 8-voice audio engine that's build-verified
- Real WAV sample import working, not just placeholder tones
- Parts sourced — Teensy 4.1, PCM5102 DAC, OLED, buttons, pots, breadboards
- Not done yet: no hardware assembled — the DAC still needs its header pins soldered on, the one actual soldering job in the whole build
What's next
Solder the DAC headers, breadboard the whole thing, then wire the device-layer code (audio engine, MIDI, UI, diagnostics) up against real hardware. Calibrate density and swing by ear once it's actually making sound. Then: use it — first target is layering it live over an actual DJ set.
I'll swap this write-up for real photos once there's something to photograph.